Here's our schedule:
May 4/15 - THIS POST
May 11/15 - Square 2
May 18/15 - Square 3
May 25/15 - Square 4
June 1/15 - Square 5
June 8/15 - Square 6
June 15/15 - Square 7
June 22/15 - Square 8
June 29/15 - Square 9
July 6/15 - Square 10
July 13/15 - Square 11
July 20/15 - Square 12
July 27/15 - Joining and Border
If you're making the scarf you will need a total of 12 squares, so you will need 1 of each square. If you're making the afghan you will need a total of 48 squares, so you will need 4 of each square. But if some of the squares don't appeal to you, you can substitute that square for another that you do love. The choice is really up to you!
The first of our squares is called 'The Trinity Square' written by Valley Weavers. You can find the pattern with a picture tutorial here on this page, or you can download a printer friendly version here.
If you have any questions regarding the pattern or the CAL in general, please post to the facebook group as you will receive the quickest response time from there. Thank you for joining us this week, look forward to seeing your progress in our facebook group and in seeing you again next week! Happy hooking!
The
Trinity Square
Pattern by: Valley Weavers
These “3” rings magically join together to form
a “4” sided square!

You will need:
Yarn:
worsted weight - I used Red Heart Love
Colors:
I used 4 colors to show off the rings design
Hook:
size “H” or 5.0mm
3
stitch markers or scrap pieces of yarn
Stitches Key:
sl st – slip
stitch st – stitch
ch – chain tr – treble/triple crochet
dc – double
crochet sc – single crochet
RING 1
Ch
13, join with a sl st to form a ring.
Rnd 1 - Ch
3 (counts as DC), 29 DC into the ring, join with a sl st to the top of the
beginning ch 3 to form a ring. Fasten off. (30 DC)
RING 2
Ch
13, insert chain tail from front to back through center of Ring 1, joining with
a sl st to form ring, careful not to twist your chain.

Rnd 1- Ch 3 (counts as DC), 29 DC into the ring, join with a sl st to the top of the beginning ch 3 to form a ring. Fasten off. (30 DC)
Rnd 1- Ch 3 (counts as DC), 29 DC into the ring, join with a sl st to the top of the beginning ch 3 to form a ring. Fasten off. (30 DC)
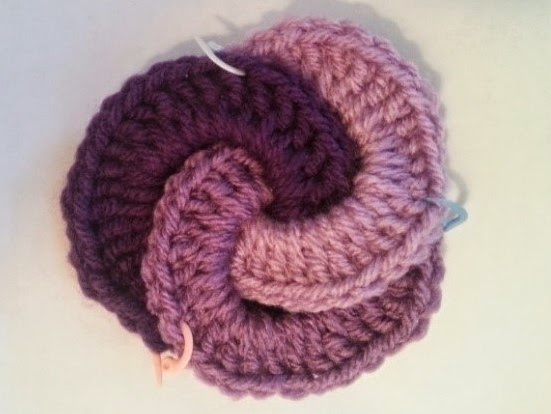
RING 3
Ch
14, insert chain tail from front to back through the center of both Ring 2 and
Ring 1 (see picture), join with a sl st to form ring, careful not to twist your
chain.

Rnd 1 - Ch
3 (counts as DC), 29 DC into the ring, join with a sl st to the top of the
beginning ch 3 to form a ring. Fasten off. (30 DC)
Weave
in all ends and arrange stitches evenly around the ring. Arrange the rings so
each beginning ch-3 is hidden behind a ring. Hold together so Ring 1 is on the
upper left, Ring 3 is on the upper right, and Ring 2 is at the bottom center.
Place
a marker through the Ring-1 and Ring-3 stitches where they overlap each other.
Counting clockwise, place a marker through the 11th st from the
first marker and through both stitches of Ring-3 and Ring 2. Continuing clockwise place a marker through
the 14th stitch where Ring-2 and Ring-1 meet.
You
should now have 40 DC (3 marked pairs of sts that count as 1 st, 11 dcs between
the first and 2nd marker, 13 dcs between the 2nd and 3rd
marker, and 13 dcs between the 3rd marker and the 1st marker.
You may need to wiggle the rings around a bit, but as long as you can get to 40
DCs you will be fine!
OUTER SQUARE
Where
ever you come to a section where 2 rings are marked, you will work whatever
stitch you are on through both layers. Your first corner is the only one that will
fall on an overlap. As you work the rounds, your project may pucker, this is
normal and it will flatten itself out as you go.
Rnd 1
Begin
the round with a standing tr (here's a great tutorial by Tamara at Moogly for standing dc, just adjust for a standing tr) through both sts at any one of the 3 overlap
markers. Ch 3, tr into the same st. This is your first corner made. (you are working only on one ring now) (ch1,
skip 1 dc, dc in next dc) four times.
*Ch1, skip 1 dc, tr, ch 3, tr into the next dc (corner made). (Ch 1,
skip 1 dc, dc in next dc) four times*.
Repeat from * 2 more times. Skip 1 dc, ch1, join with a slip stitch to
the top of the first tr. Fasten off.

Rnd 2
Join
new color with a standing sc (here's a great tutorial by Tamara at Moogly) in any corner ch space. Ch 1, sc, ch 1, sc in the
same st. *(Ch1, sc in the next chain space)
five times, (ch1, sc) three times in corner space. Repeat from * three times.
Ch1, join with a slip st to beginning sc and fasten off.

Rnd 3
Join
new color with a standing sc in any first ch 1 space of any corner, ch3, sc
into the next ch space of the corner. *(Ch1, sc in the next space) six times,
ch 1. In corner space, sc in first ch
space, ch3, sc into the next ch space of the corner*. Repeat from * three
times. Join with a slip st to beginning sc and fasten off.

Rnd 4
Join
new color with a standing sc in ch 3 space of any corner, ch1, sc into the same
ch 3 space. *(Ch1, sc in the next space) seven times, ch 1, then in corner ch 3
space, sc, ch2, sc. * Repeat from * three times. Join with a slip st to
beginning sc and fasten off.

This
should give you a 6 inch square. If it doesn't, you can repeat Rnd 4 and make
eight repeats between corners instead of seven.
This pattern is free for use and any items made from this pattern may be sold, however, this pattern cannot be sold by anyone else. This blog should also be referenced by anyone who shares the file or a finished project. Copying of this pattern on another blog or site is prohibited.
This pattern is free for use and any items made from this pattern may be sold, however, this pattern cannot be sold by anyone else. This blog should also be referenced by anyone who shares the file or a finished project. Copying of this pattern on another blog or site is prohibited.